
Homemade yogurt in the crockpot
Hello!! 🙋 It's been a while since I've been here (I know, story of my life and this blog) and I thought it was about time I pop in to say hello.
Life has been a little more busy lately with my work schedule picking up (thank the Lord!), tons of family wedding and birthday celebrations, and activities with friends. I'm not overly busy and would like to continue increasing my work hours, but I'm loving all the activities I've been up to lately and cannot complain. With life getting a little busier, I have to be more conscientious about meal planning. It's important to be able to eat what I want when I want it, but in order to do that I have to have a plan so that there IS food around when I want/need it. Flexible meal planning is the name of the game.
One thing I've been doing recently is making my own yogurt for breakfast bowls or snacks. It's not necessary to make you're own, but it's a lot cheaper than store bought and making it myself makes me enjoy it even more. You appreciate the things you put time into. At first, I was super intimidated, but got the hang of it. Now I make it just about every week! Just an FYI, this is a looong process, so I recommend starting it in the early evening so that it can culture overnight (start around 4 pm).

Basically, you heat milk to a certain temperature, cool it to a certain temperature, add in the culture, and then let it sit for 12 hours at a warm temperature. Then you strain it and are left with yummy, homemade yogurt!

A quick word on probiotics. Gut health is definitely a buzz topic right now. While getting my masters, I did research on gut bacteria as it relates to health and I found it absolutely fascinating! Our gut (intestines) contains millions of little bacteria that play a role in a variety of different processes in our body. They have the potential to benefit our bodies through strengthening our immune system, maintaining intestinal tissue health, digesting food in our colon, producing vitamins, killing off harmful bacteria, and FAR more. Researchers are constantly finding out more about the role of certain bacteria in our gut and how they can help or hinder our health and everyday life. With our very stressful lifestyles, lack of proper self-care, lack of adequate nutrition, illness, and use of antibiotics, the types of bacteria in our gut can change and cause various symptoms such as constipation, diarrhea, a weekend immune system, etc. This is why eating cultured foods with beneficial bacteria (probiotics) and foods high in fiber (prebiotics--food for the bacteria) is so important. Hello dairy, fermented foods, whole grains, and veggies! It's another reason why it's super important to get a variety of foods in our diet. A diet high in fat and protein can cause harmful bacteria to overgrow. A diet high in refined carbs can cause harmful bacteria to grow. We need all the food components, people: a balance of protein, carbs, and fat from a variety of food sources.

In the past I have had clients ask me about which probiotic brand I recommend and I wasn't able to really give a recommendation. That's why I thought THIS review was so helpful! It separates fact from fiction and then gives recommendations based on the different criteria that actually matter. I think it does a good job of explaining things in layman's terms, but still uses scientific research to back up their claims. I recommend you check it out!
And now to making your own yogurt. If you've got the time, give it a try and let me know what you think!


Homemade Yogurt in the Crockpot
Ingredients
- 1 gallon 2% or whole milk (yay for creamy yogurt!!)
- 3 Tbsp cultured yogurt (homemade or store bought)
- 1/3 cup honey or maple syrup (optional)
- 2 tsp vanilla extract (optional)
Instructions
- Pour 1 gallon of cow's milk into a crockpot and turn on high for 1-2 hours until it reaches 190 degrees with a food thermometer (I used an instant meat thermometer). This ensures that the proteins denature so that the yogurt can set up.
- Once it reaches 190, turn off the crockpot and leave the lid ajar so that heat can escape until it reaches 110 degrees, the temperature at which the bacteria can grow. (If it’s much hotter than this, it will kill the bacteria.) This will take an hour or two as well.
- Once it cools to 110, remove 1/2 cup of milk and mix in 3 Tbsp cultured yogurt until it is thoroughly combined. Add milk/yogurt mixture back into the crockpot and honey, if using, and lightly stir in zig-zag motions.
- Put the lid back on and wrap a towel around the crockpot (I occasionally turn the crockpot on warm for 5-10 minutes to warm it all back up—but be careful to not let it get too hot). Let it culture for 10-12 hours until it is set and the whey is separated from the yogurt.
- Using a cheesecloth or coffee filter over a strainer, strain the yogurt for about 2 hours so that you are left with a thicker yogurt. I have to divide mine between two strainers. If your yogurt is lumpy after straining, put it in your food processor or blender for a few minutes for a super silky texture!
- PS You can use the whey that separates out in smoothies, muffins, etc. It’s the portion that has a lot of the vitamins and minerals!
- Pour 1 gallon of cow's milk into instapot, press "Yogurt" setting, and adjust pressure to boil.
- Once mixture reaches boiling, put metal insert in a very large bowl with ice and water until milk reaches 110 degrees.
- Remove 1/2 cup of milk and mix in 3 Tbsp cultured yogurt until it is thoroughly combined. Add milk/yogurt mixture back into the crockpot and honey, if using, and lightly stir in zig-zag motions. Put the lid back on and adjust yogurt setting to 8 hours.
- Once yogurt is set, filter yogurt using a cheesecloth or coffee filter over a strainer. Strain the yogurt for about 2 hours so that you are left with a thicker yogurt. I have to divide mine between two strainers. If your yogurt is lumpy after straining, put it in your food processor or blender for a few minutes for a super silky texture!
In case you missed the link above, the probiotic supplement review can be found at http://www.reviews.com/probiotic-supplement/

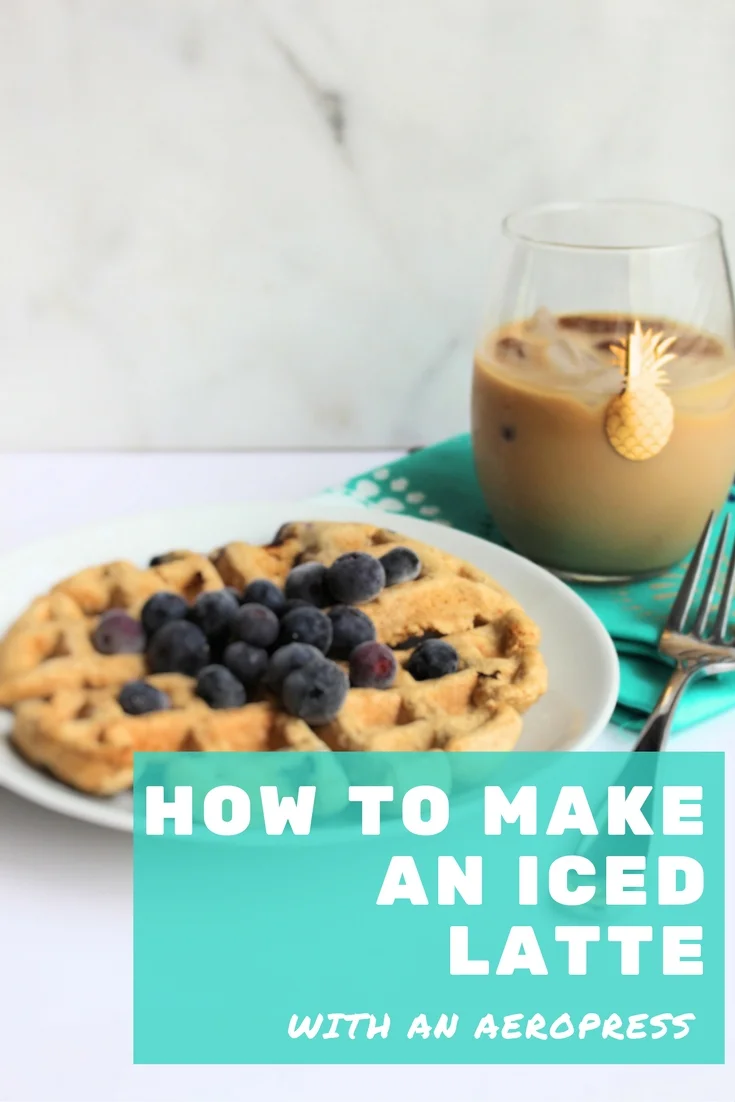
*GIVEAWAY*!!! How to make an iced latte with an aeropress
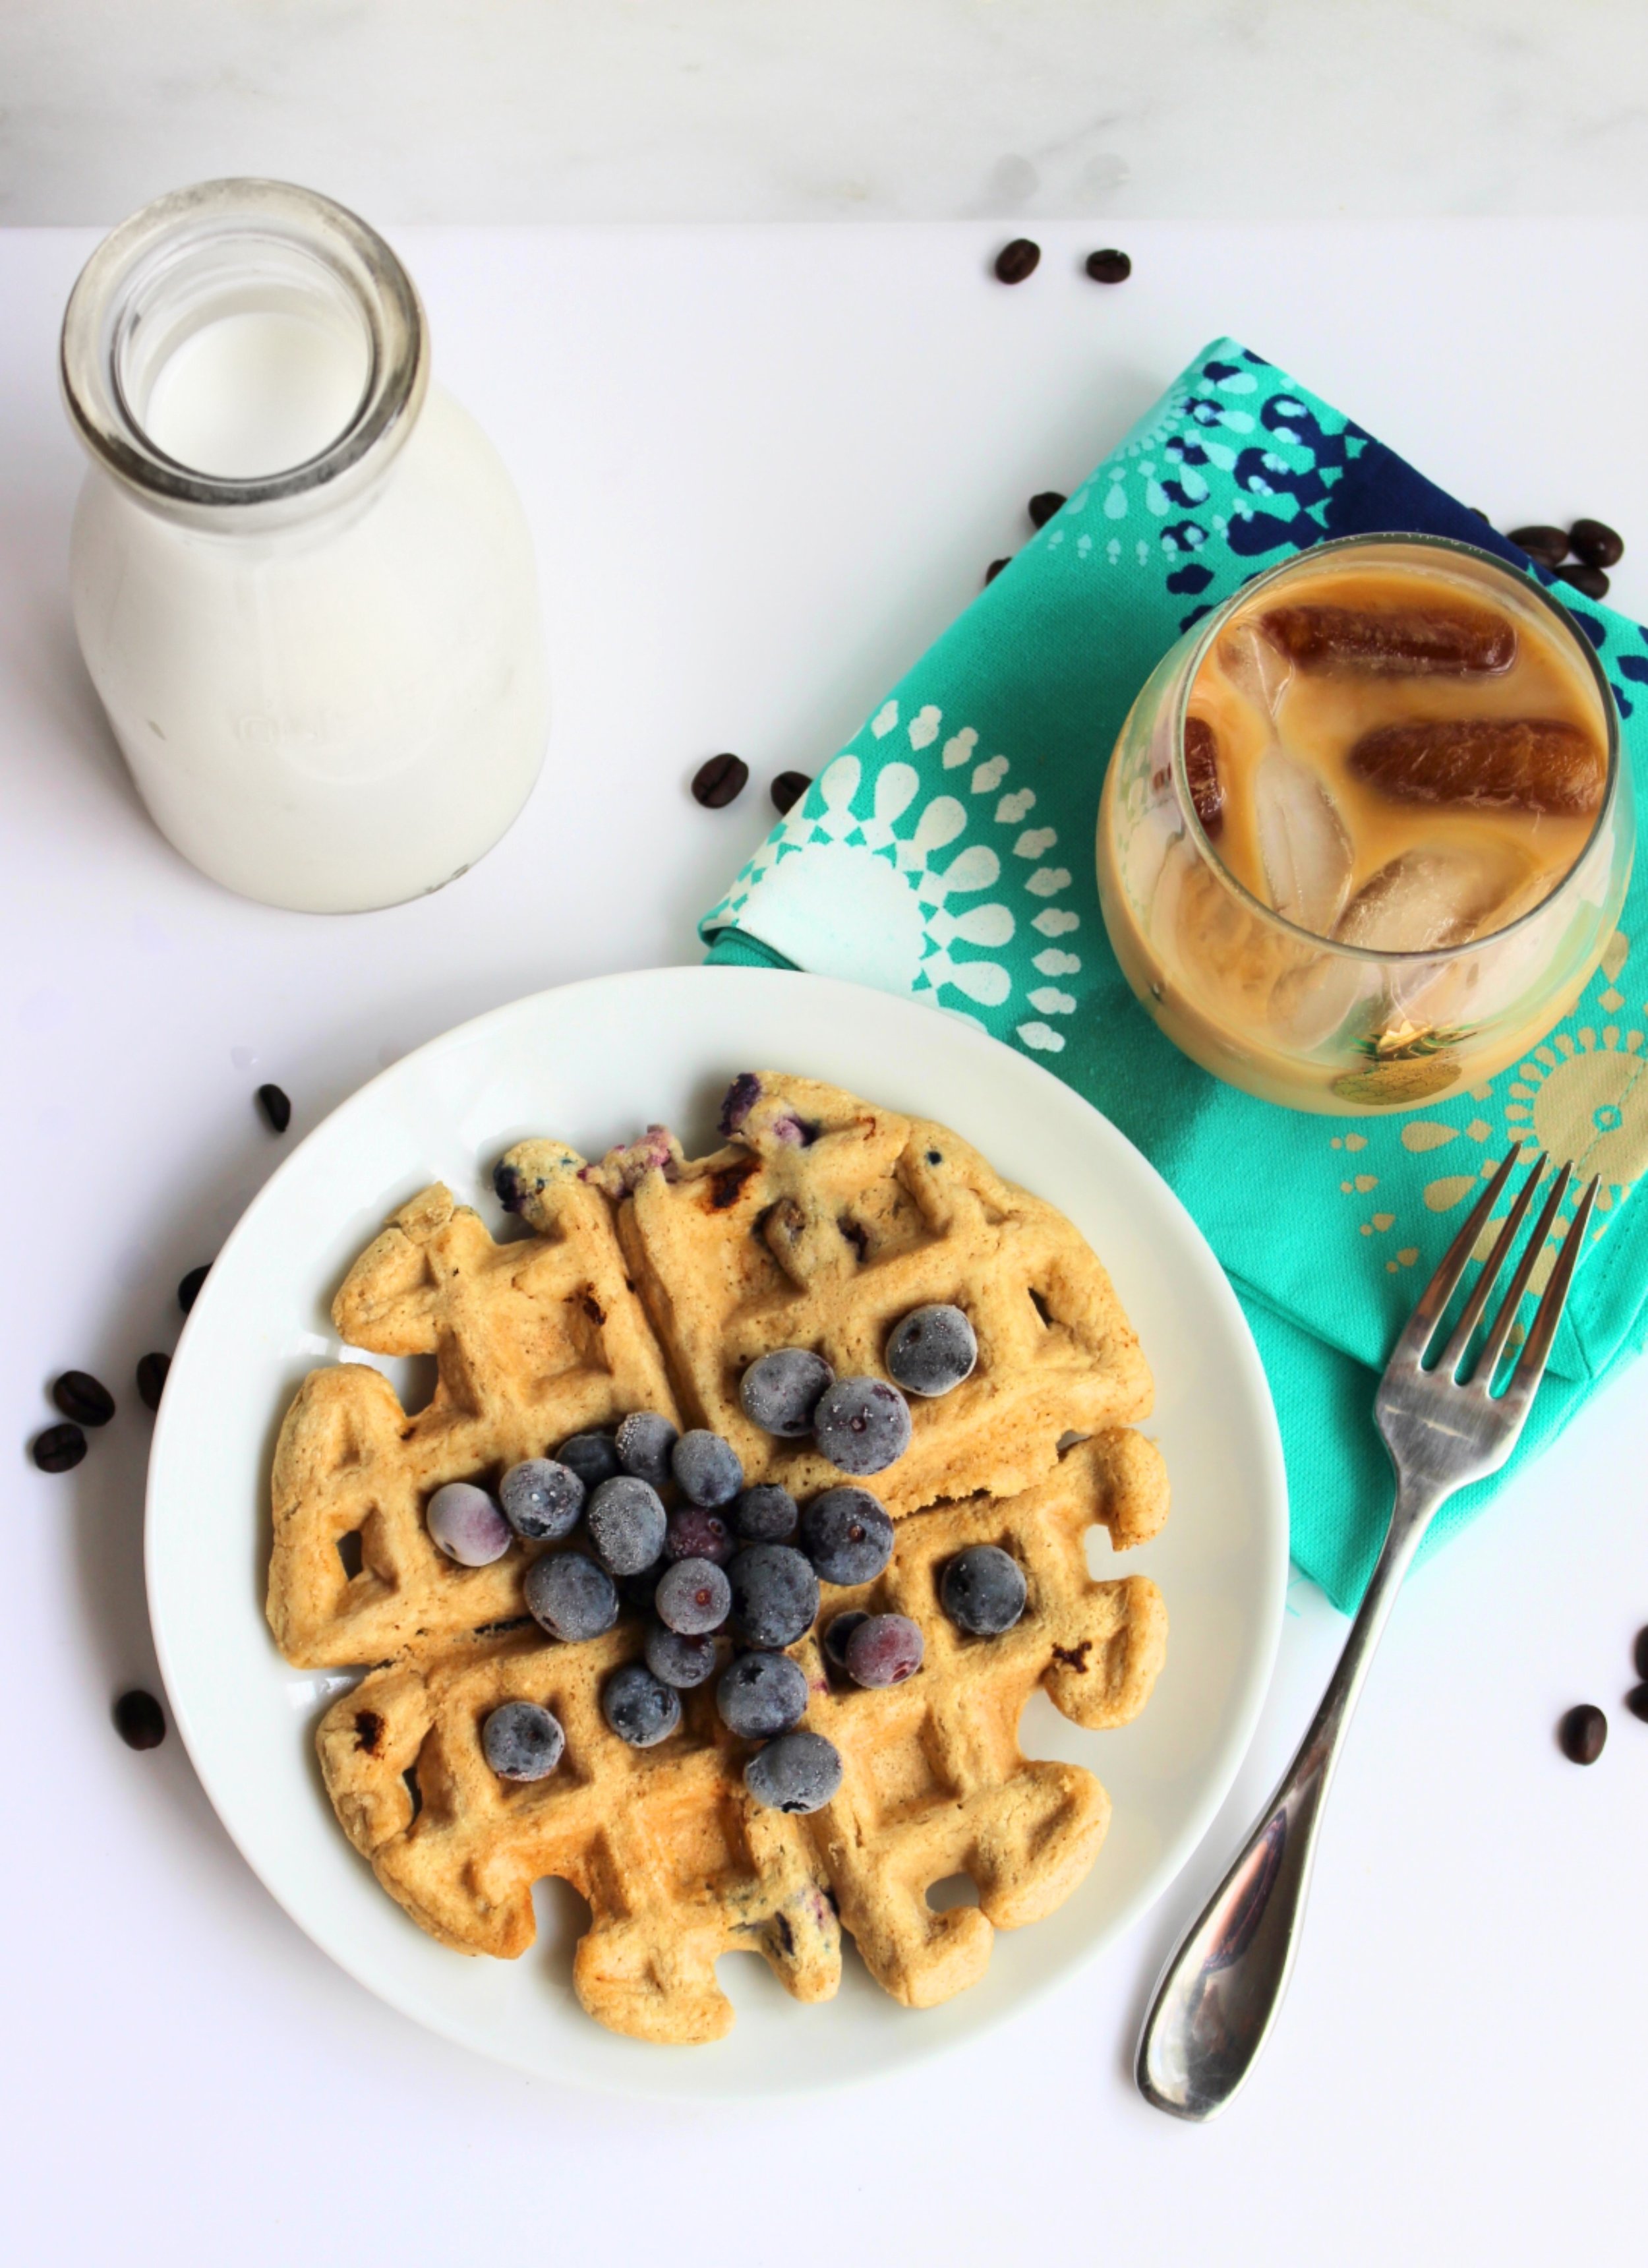
If you've followed me for a hot second on instagram, you know that I love iced lattes. I can't think of a meal that an iced latte wouldn't make complete. Iced lattes all day, every day :-) However, at $5 a drink, it's not a habit I can afford to keep regular. I mean, Isaac only lets me allocate $40 a month for blow money #budgetprobs. So awhile back I started to experiment with making my own iced lattes.
Although Aeropress is sponsoring this giveaway, I was not compensated for my time and all opinions are completely my own.
If you've followed me for a hot second on instagram, you know that I love iced lattes. I can't think of a meal that an iced latte wouldn't make complete. Iced lattes all day, every day :-) However, at $5 a drink, it's not a habit I can afford to keep regular. I mean, Isaac only lets me allocate $40 a month for blow money #budgetprobs. So awhile back I started to experiment with making my own iced lattes.
Then came a string of very disappointing iced drinks. I tried brewing strong coffee over ice, cooling brewed coffee and adding milk and ice, instant coffee with ice and milk, and even tried making espresso with a mokapot. All resulted in watered down coffee/milk (or a disgusting, bitter product with the mokapot) that I always poured down the drain. Wah wah. Then an amazing thing happened. My husband bought me an aeropress (and burr grinder--fancy fancy) for our anniversary. Really, I think it was more of a gift for himself than for me (sorry, babe), but it turned out to be the best. gift. ever. After a few failed attempts, and reading multiple blogs and watching several youtube videos, I finally came up with a delicious drink that strongly resembles an iced latte made with espresso!

Now, this can't be considered true espresso, because apparently there are strict guidelines for the temperature and pressure in order for it to be considered espresso, but this tastes pretty darn close. (in my opinion at least). The secret is to use freshly ground espresso beans, press the grounds tightly in the aeropress, and to add a filter on top of the beans (in addition to below the grounds). This increases the pressure needed to push the water through the aeropress, which I'm pretty sure allows it to extract more flavor.
The aeropress can be used to make more than just espresso. I think it was originally intended to make regular coffee. It just happens to be the perfect tool for making espresso :-). The great thing about it is that it takes up barely any space, it's portable, it's super affordable, it makes great coffee/espresso, and all you need is boiling water and coffee grinds. Two thumbs up.
So I wanted to share with you all, the how-to on making this perfect iced latte. Aaaand, the makers of the aeropress were generous enough to offer a free giveaway for one lucky reader!!! See below for how to enter!
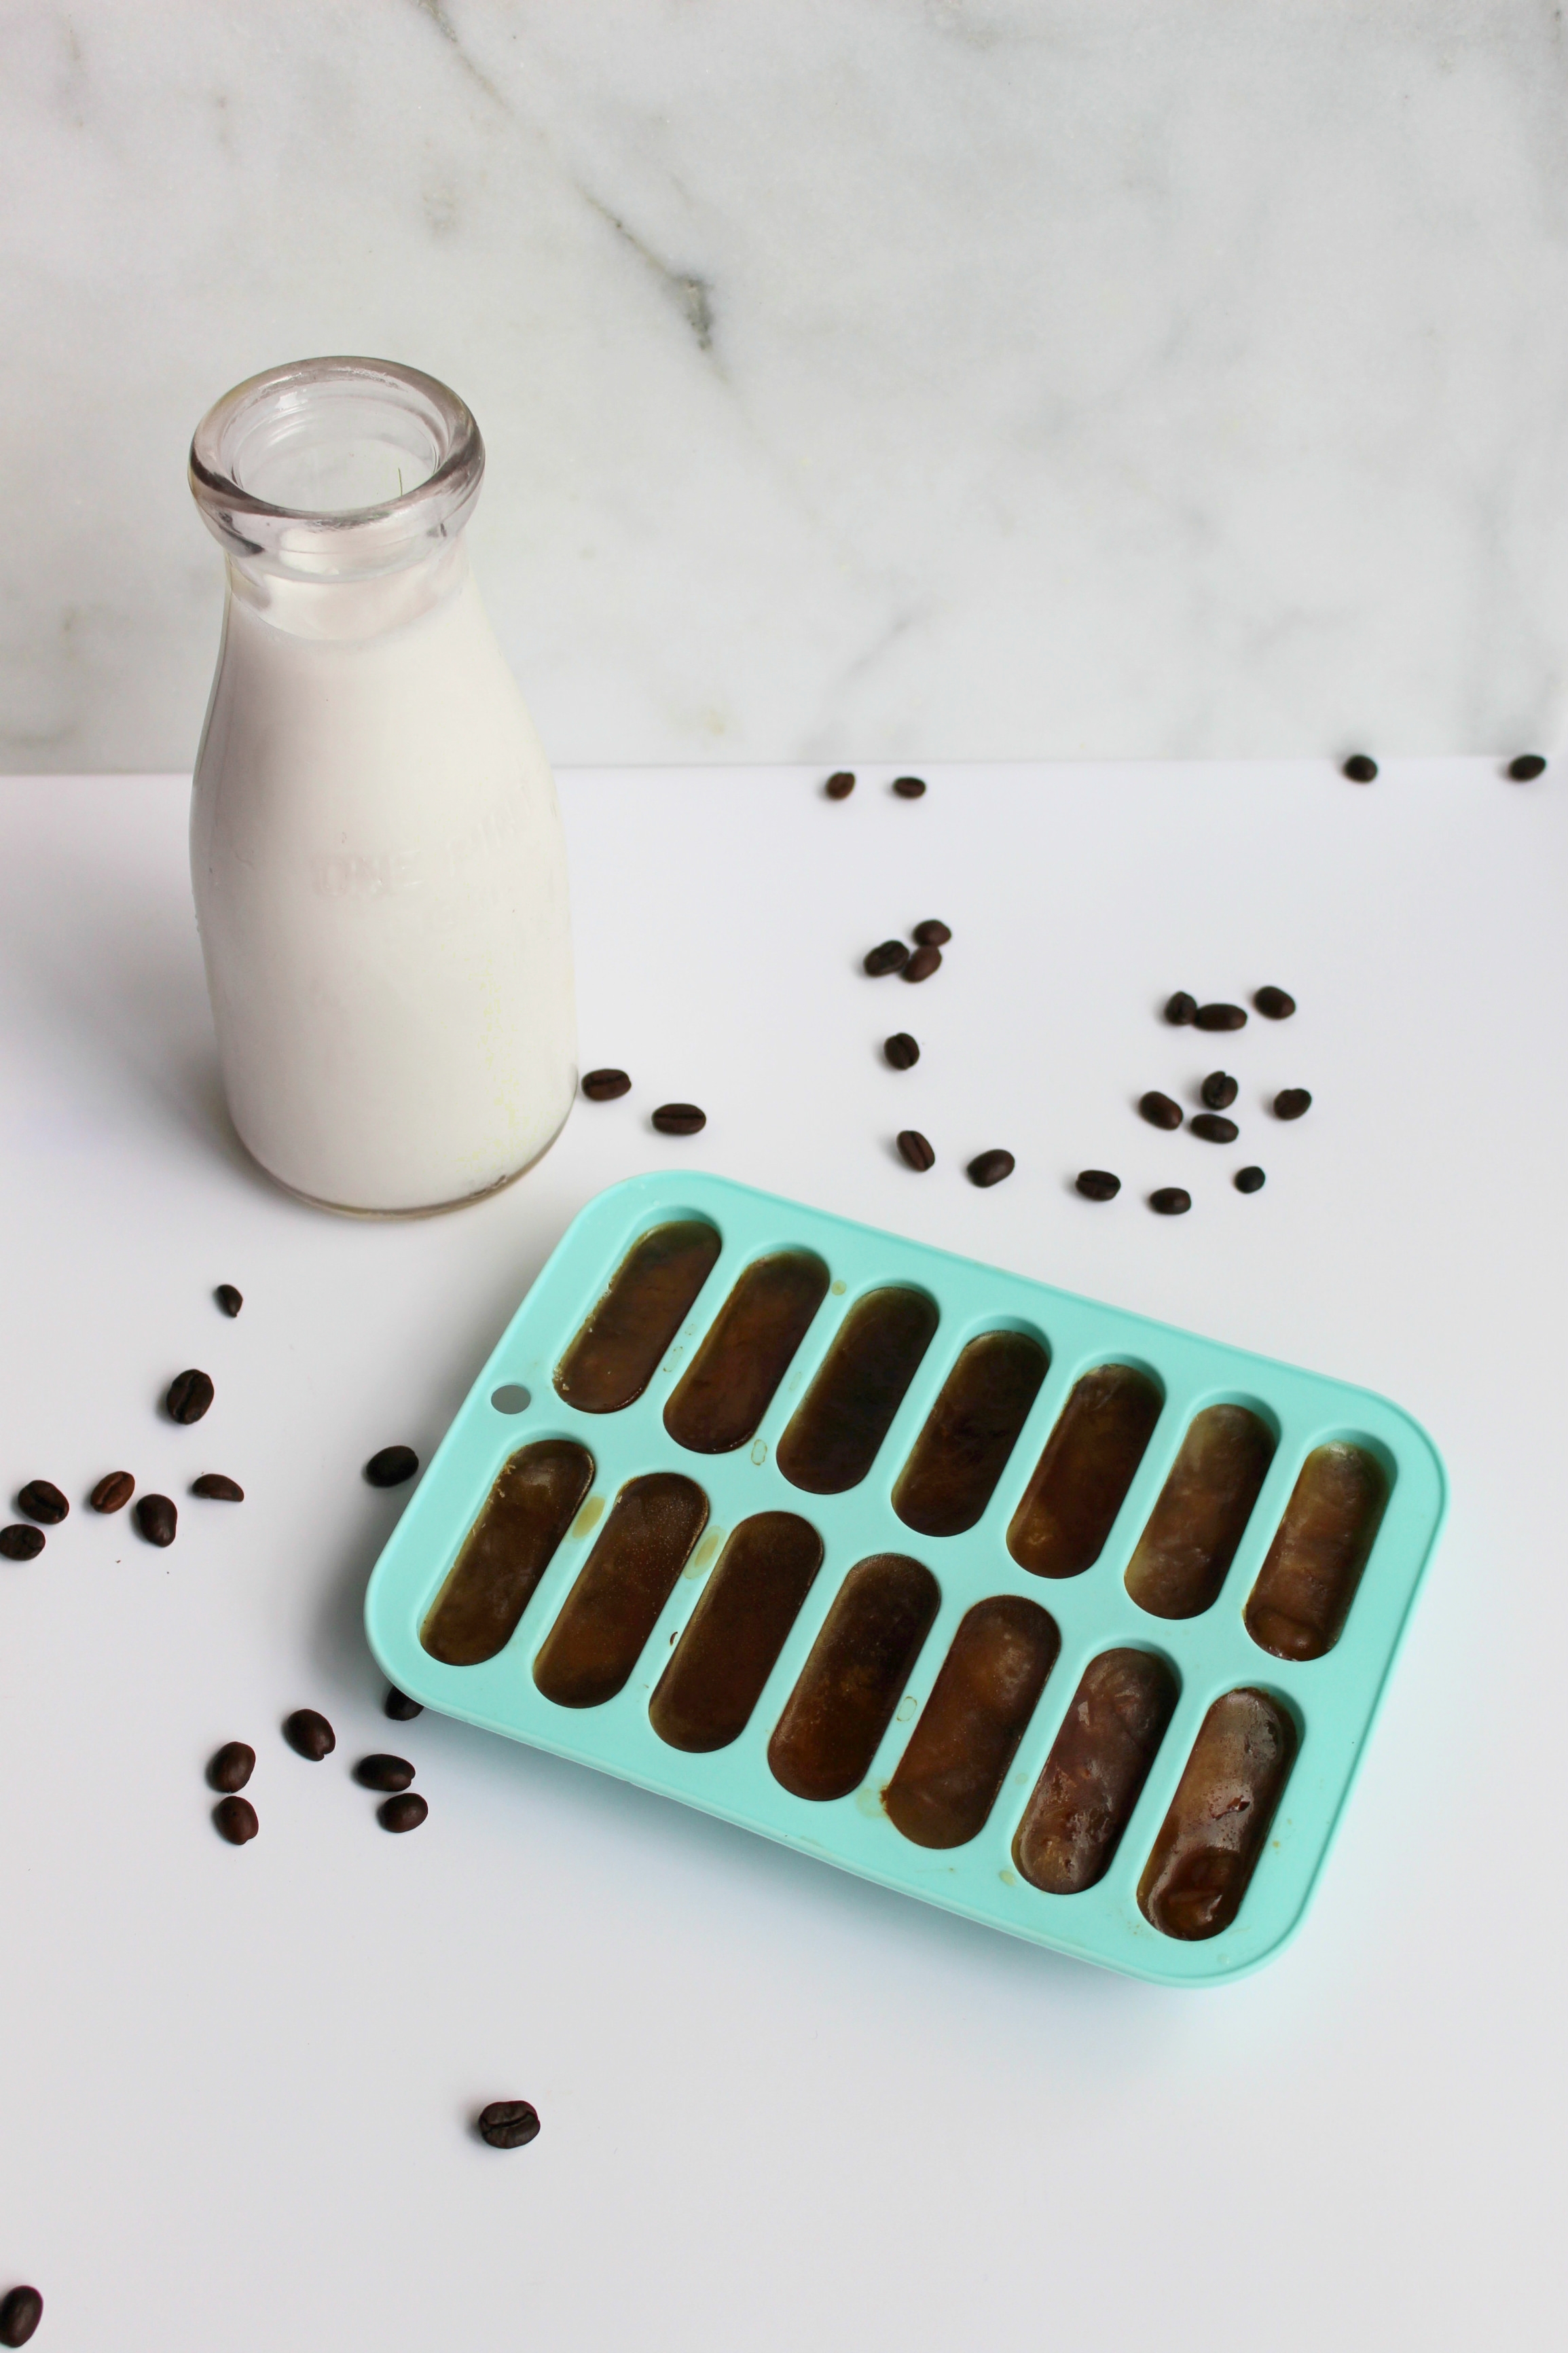
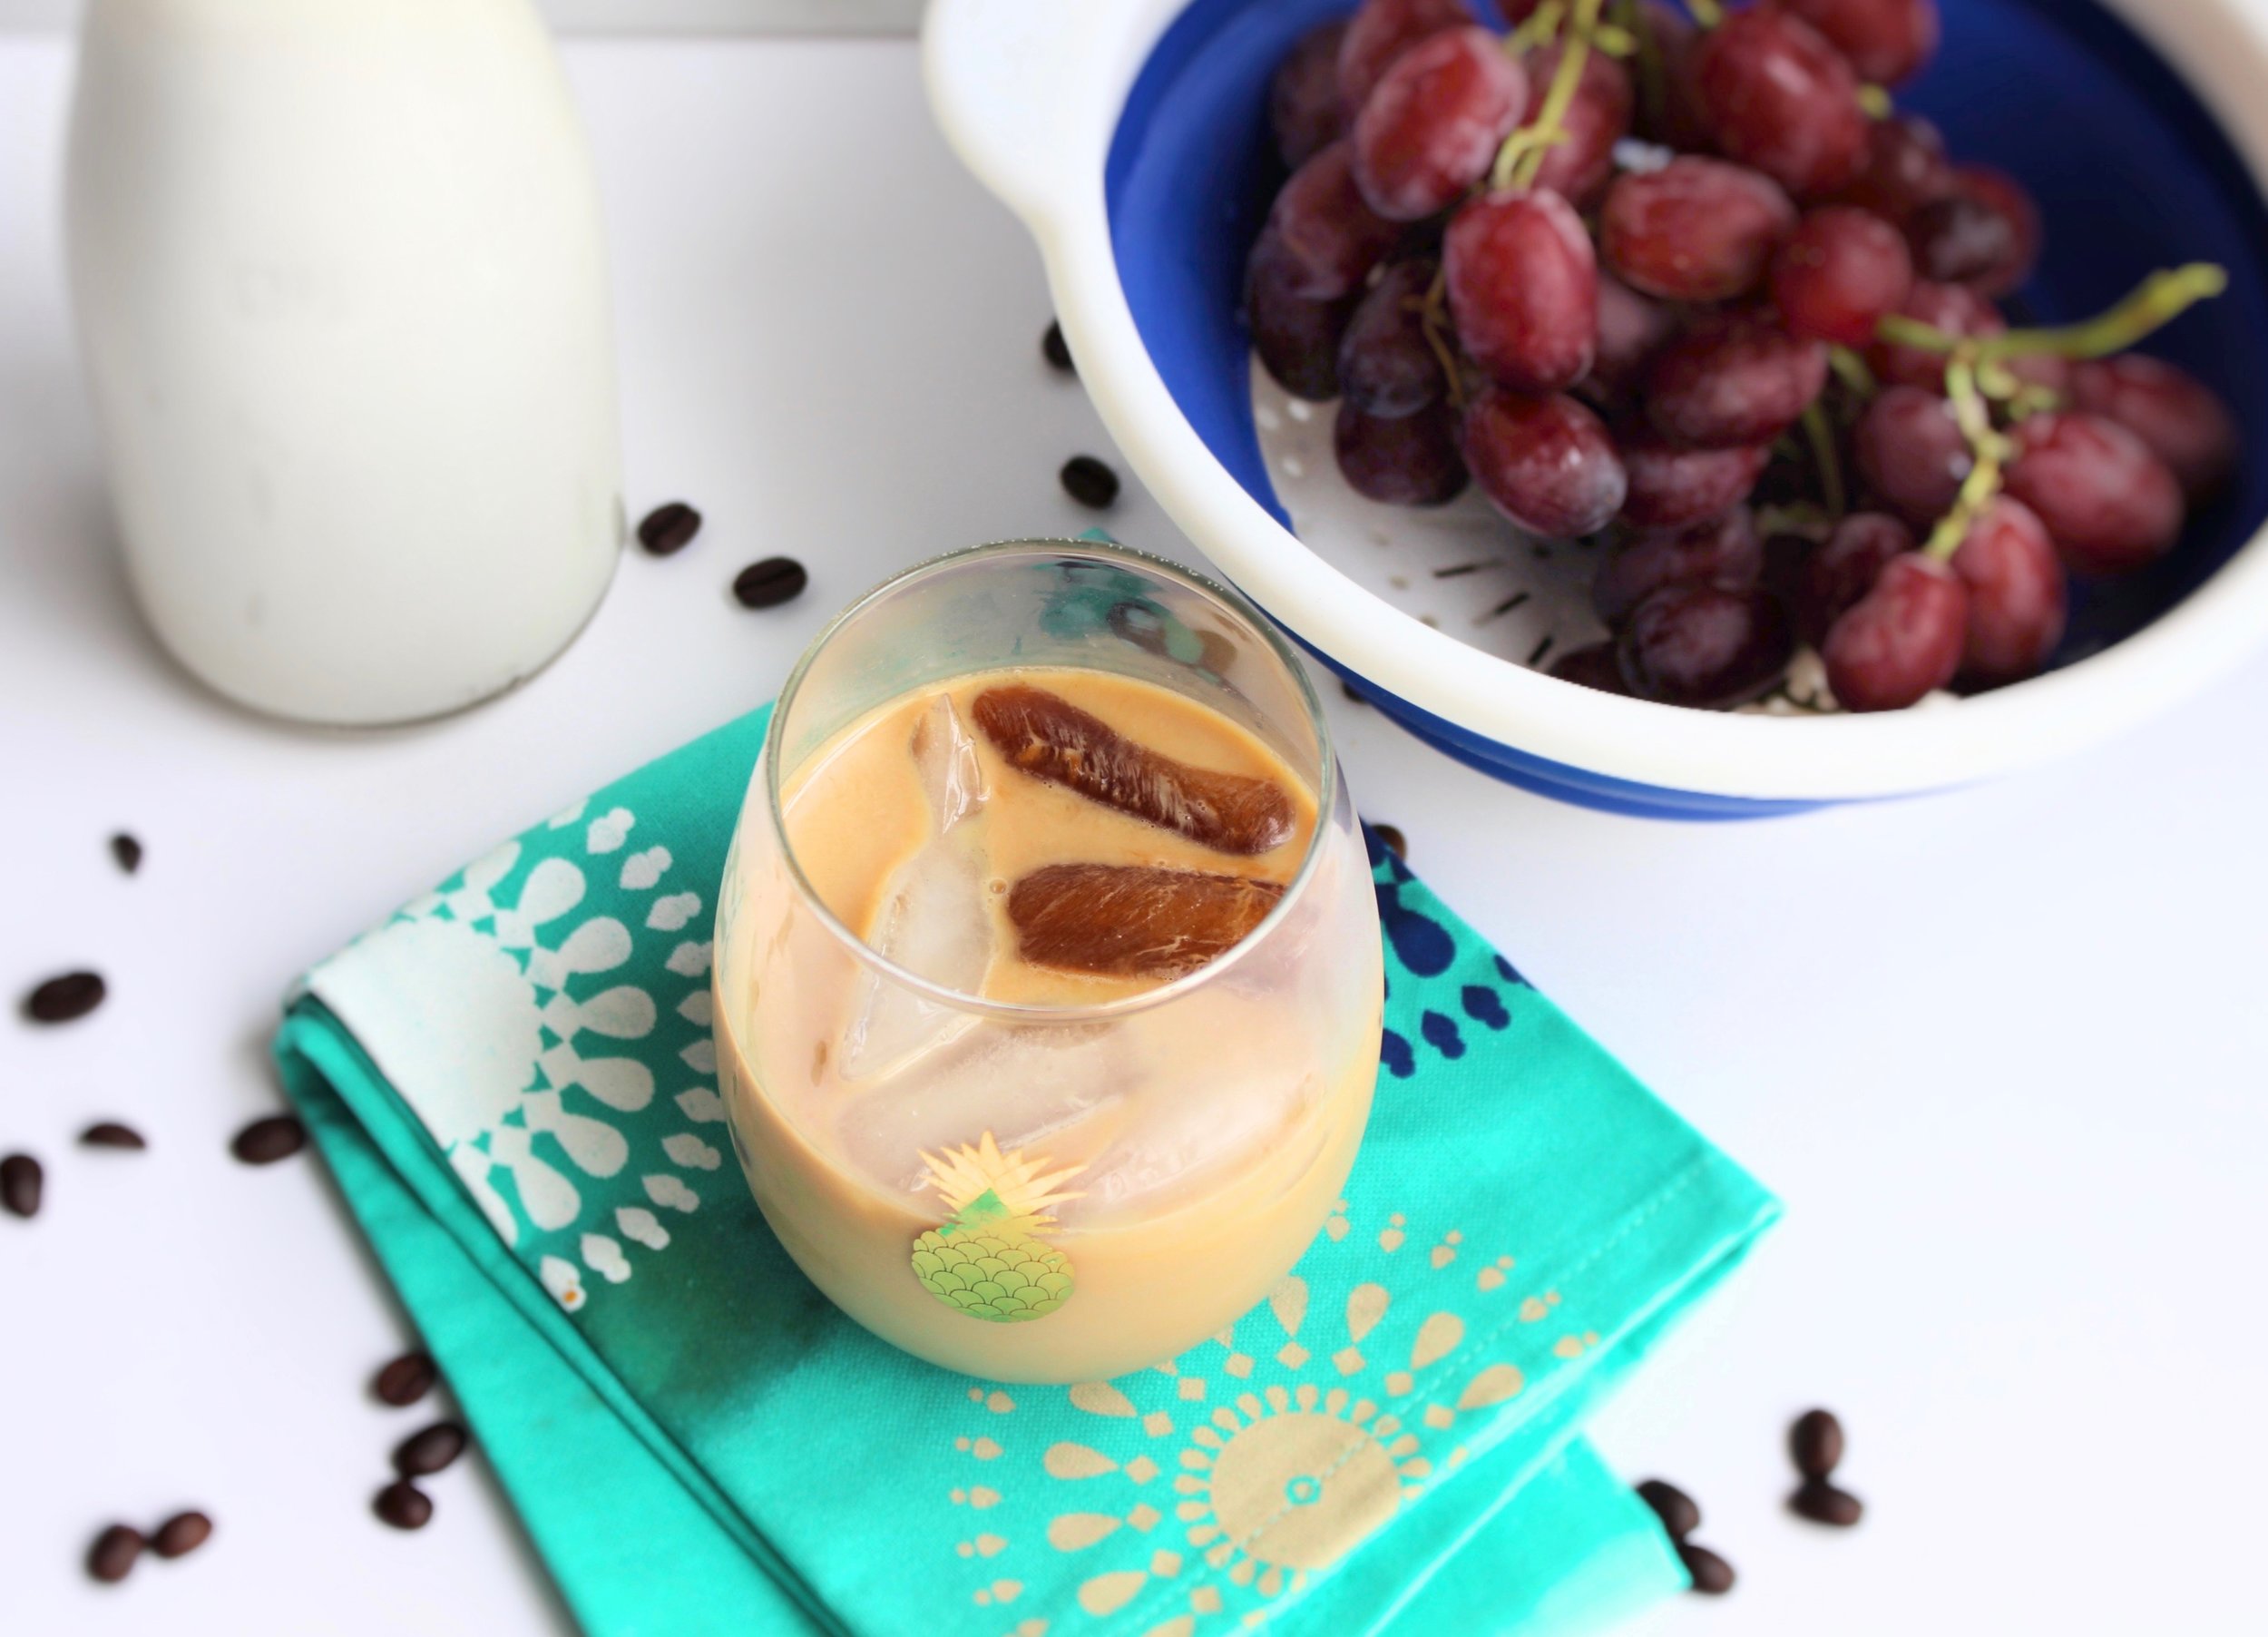
The first step is to make ice cubes made from brewed coffee. This isn't absolutely necessary, but I think it's much better because I don't like watered down iced lattes. I bought the ice cube tray in my picture on clearance at target. Isn't it so cute??
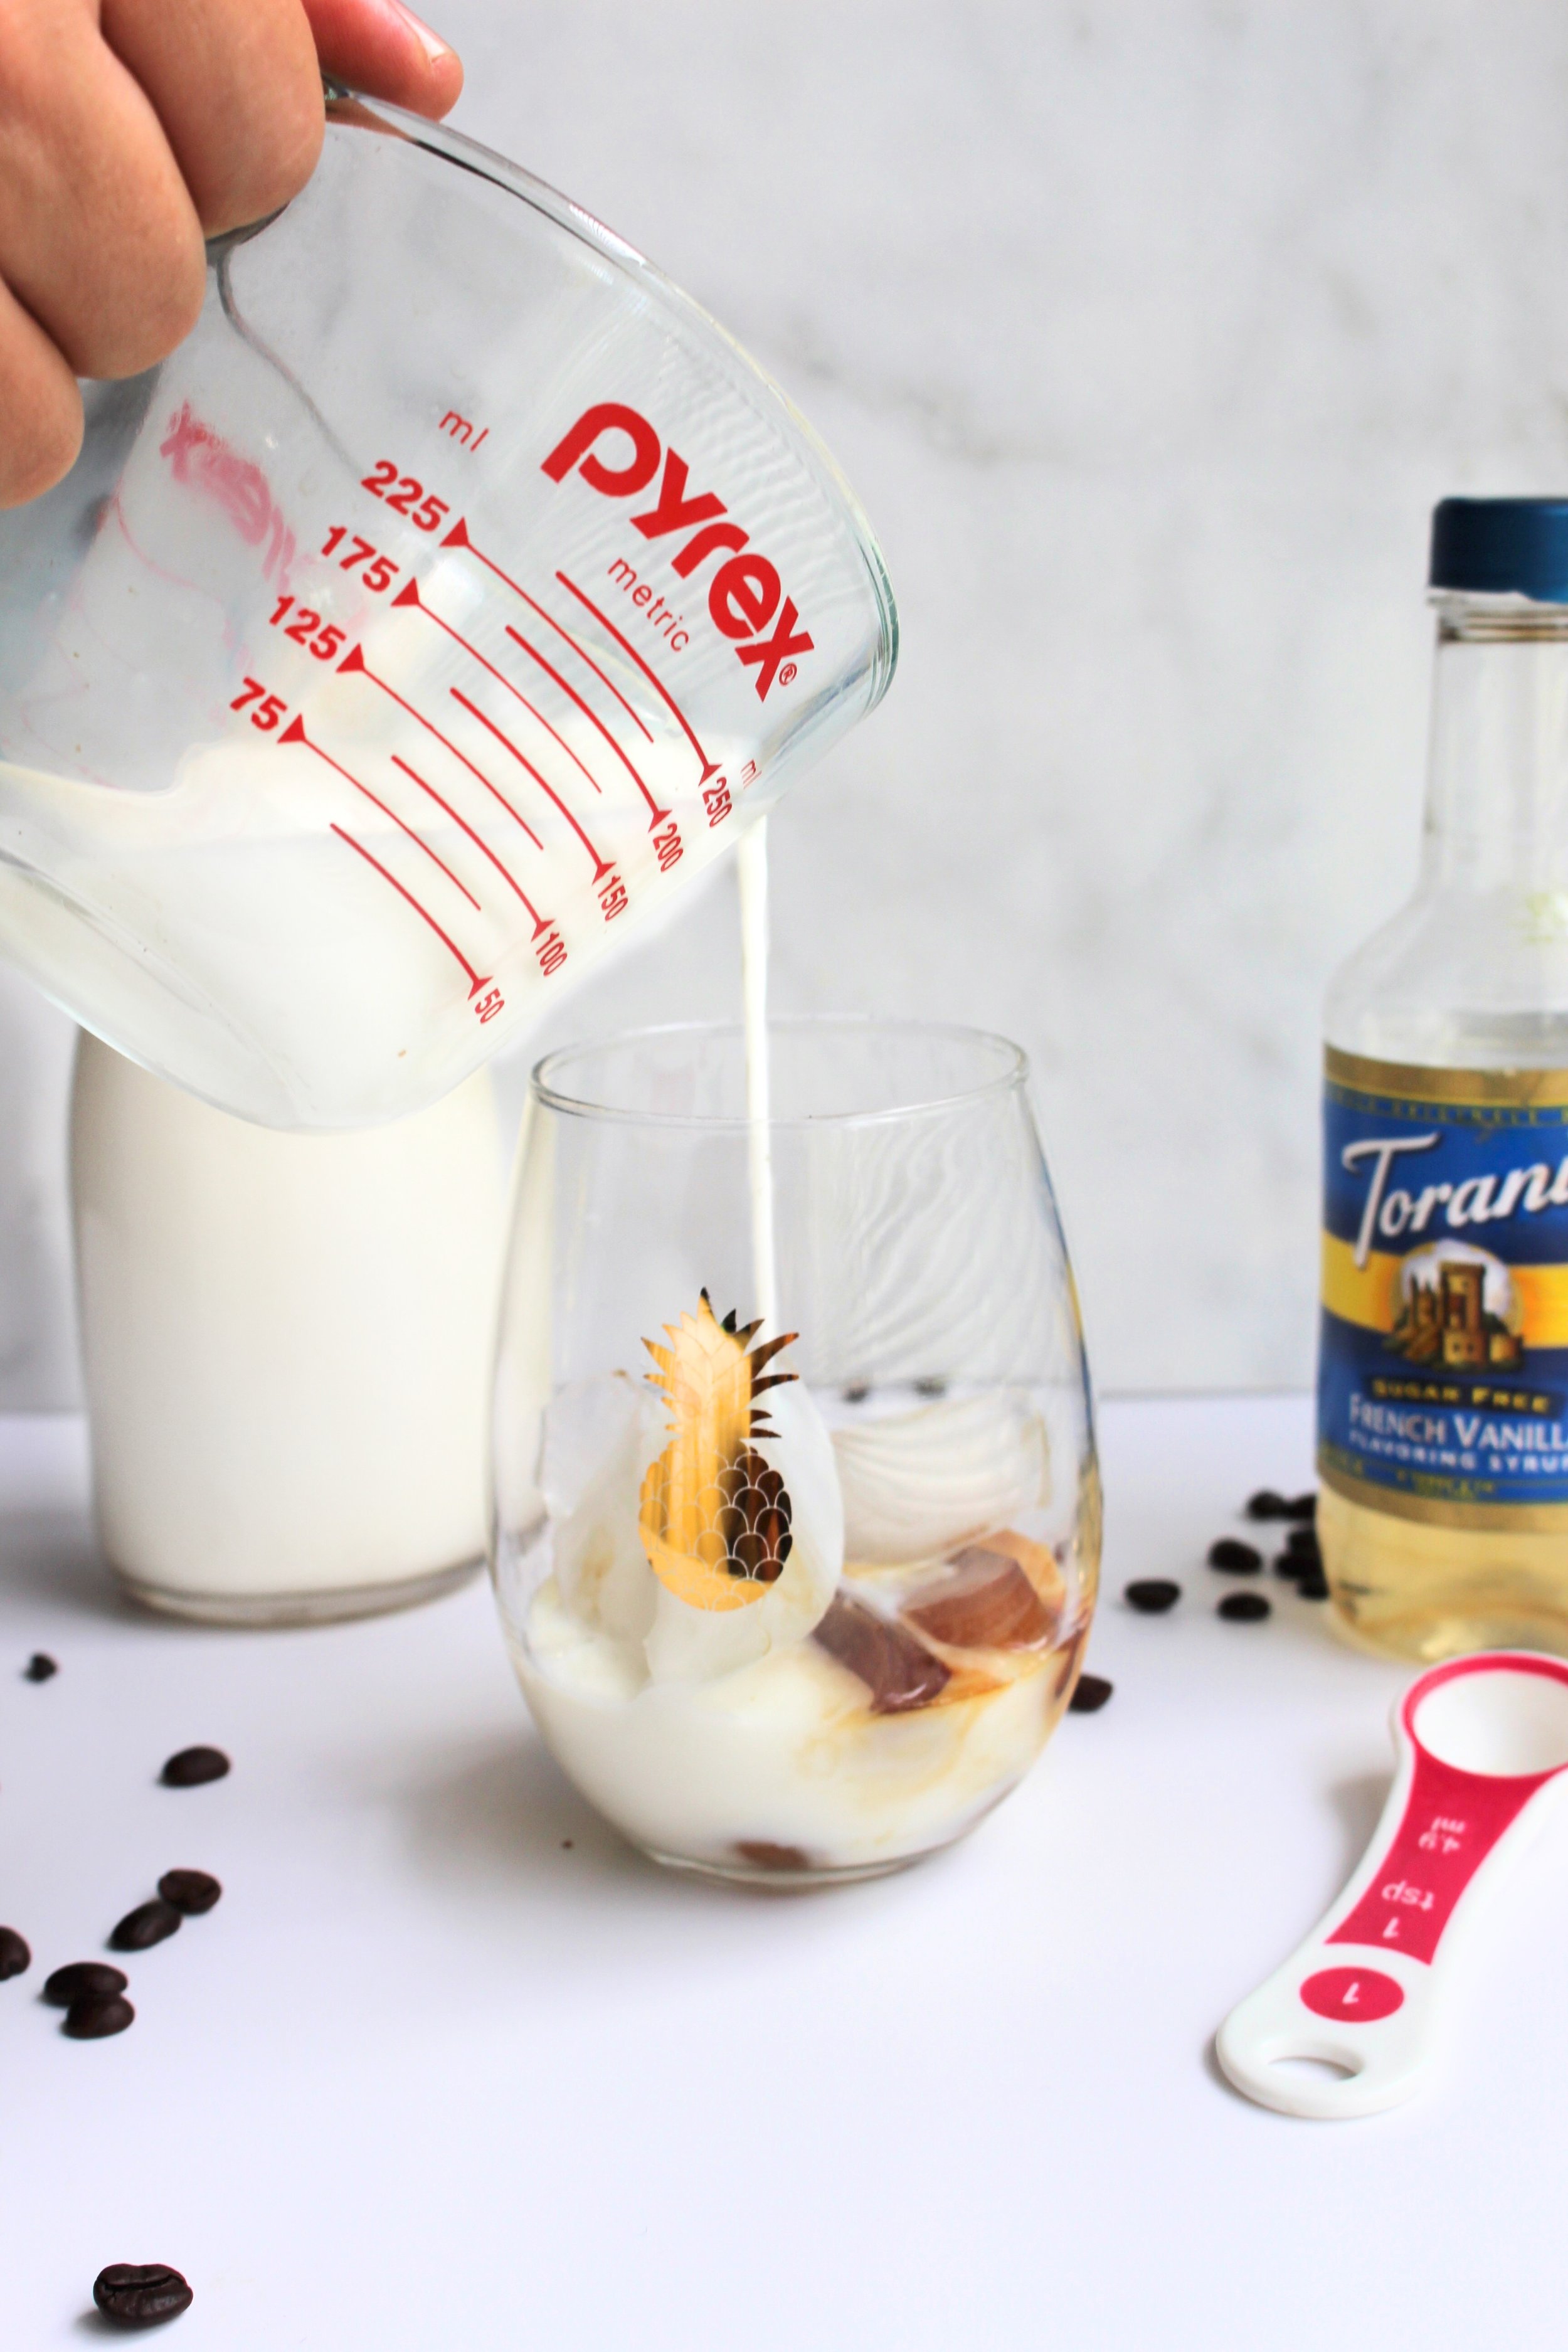
Once you have coffee ice cubes prepared, you're ready to get started. Pour 2/3 cup of milk into your cup and add 2 tsp of flavored coffee syrup. I'm personally a fan of vanilla, but you choose whatever flavor is your favorite. Oh, and go with cow's milk if you can handle dairy. It is waaaay better. Why drink something you don't even really like?! (I'm looking at you almond milk)...Then add a few coffee ice cubes and a few regular ice cubes. Place your cup in the freezer (that way your milk gets niiiice and cold).
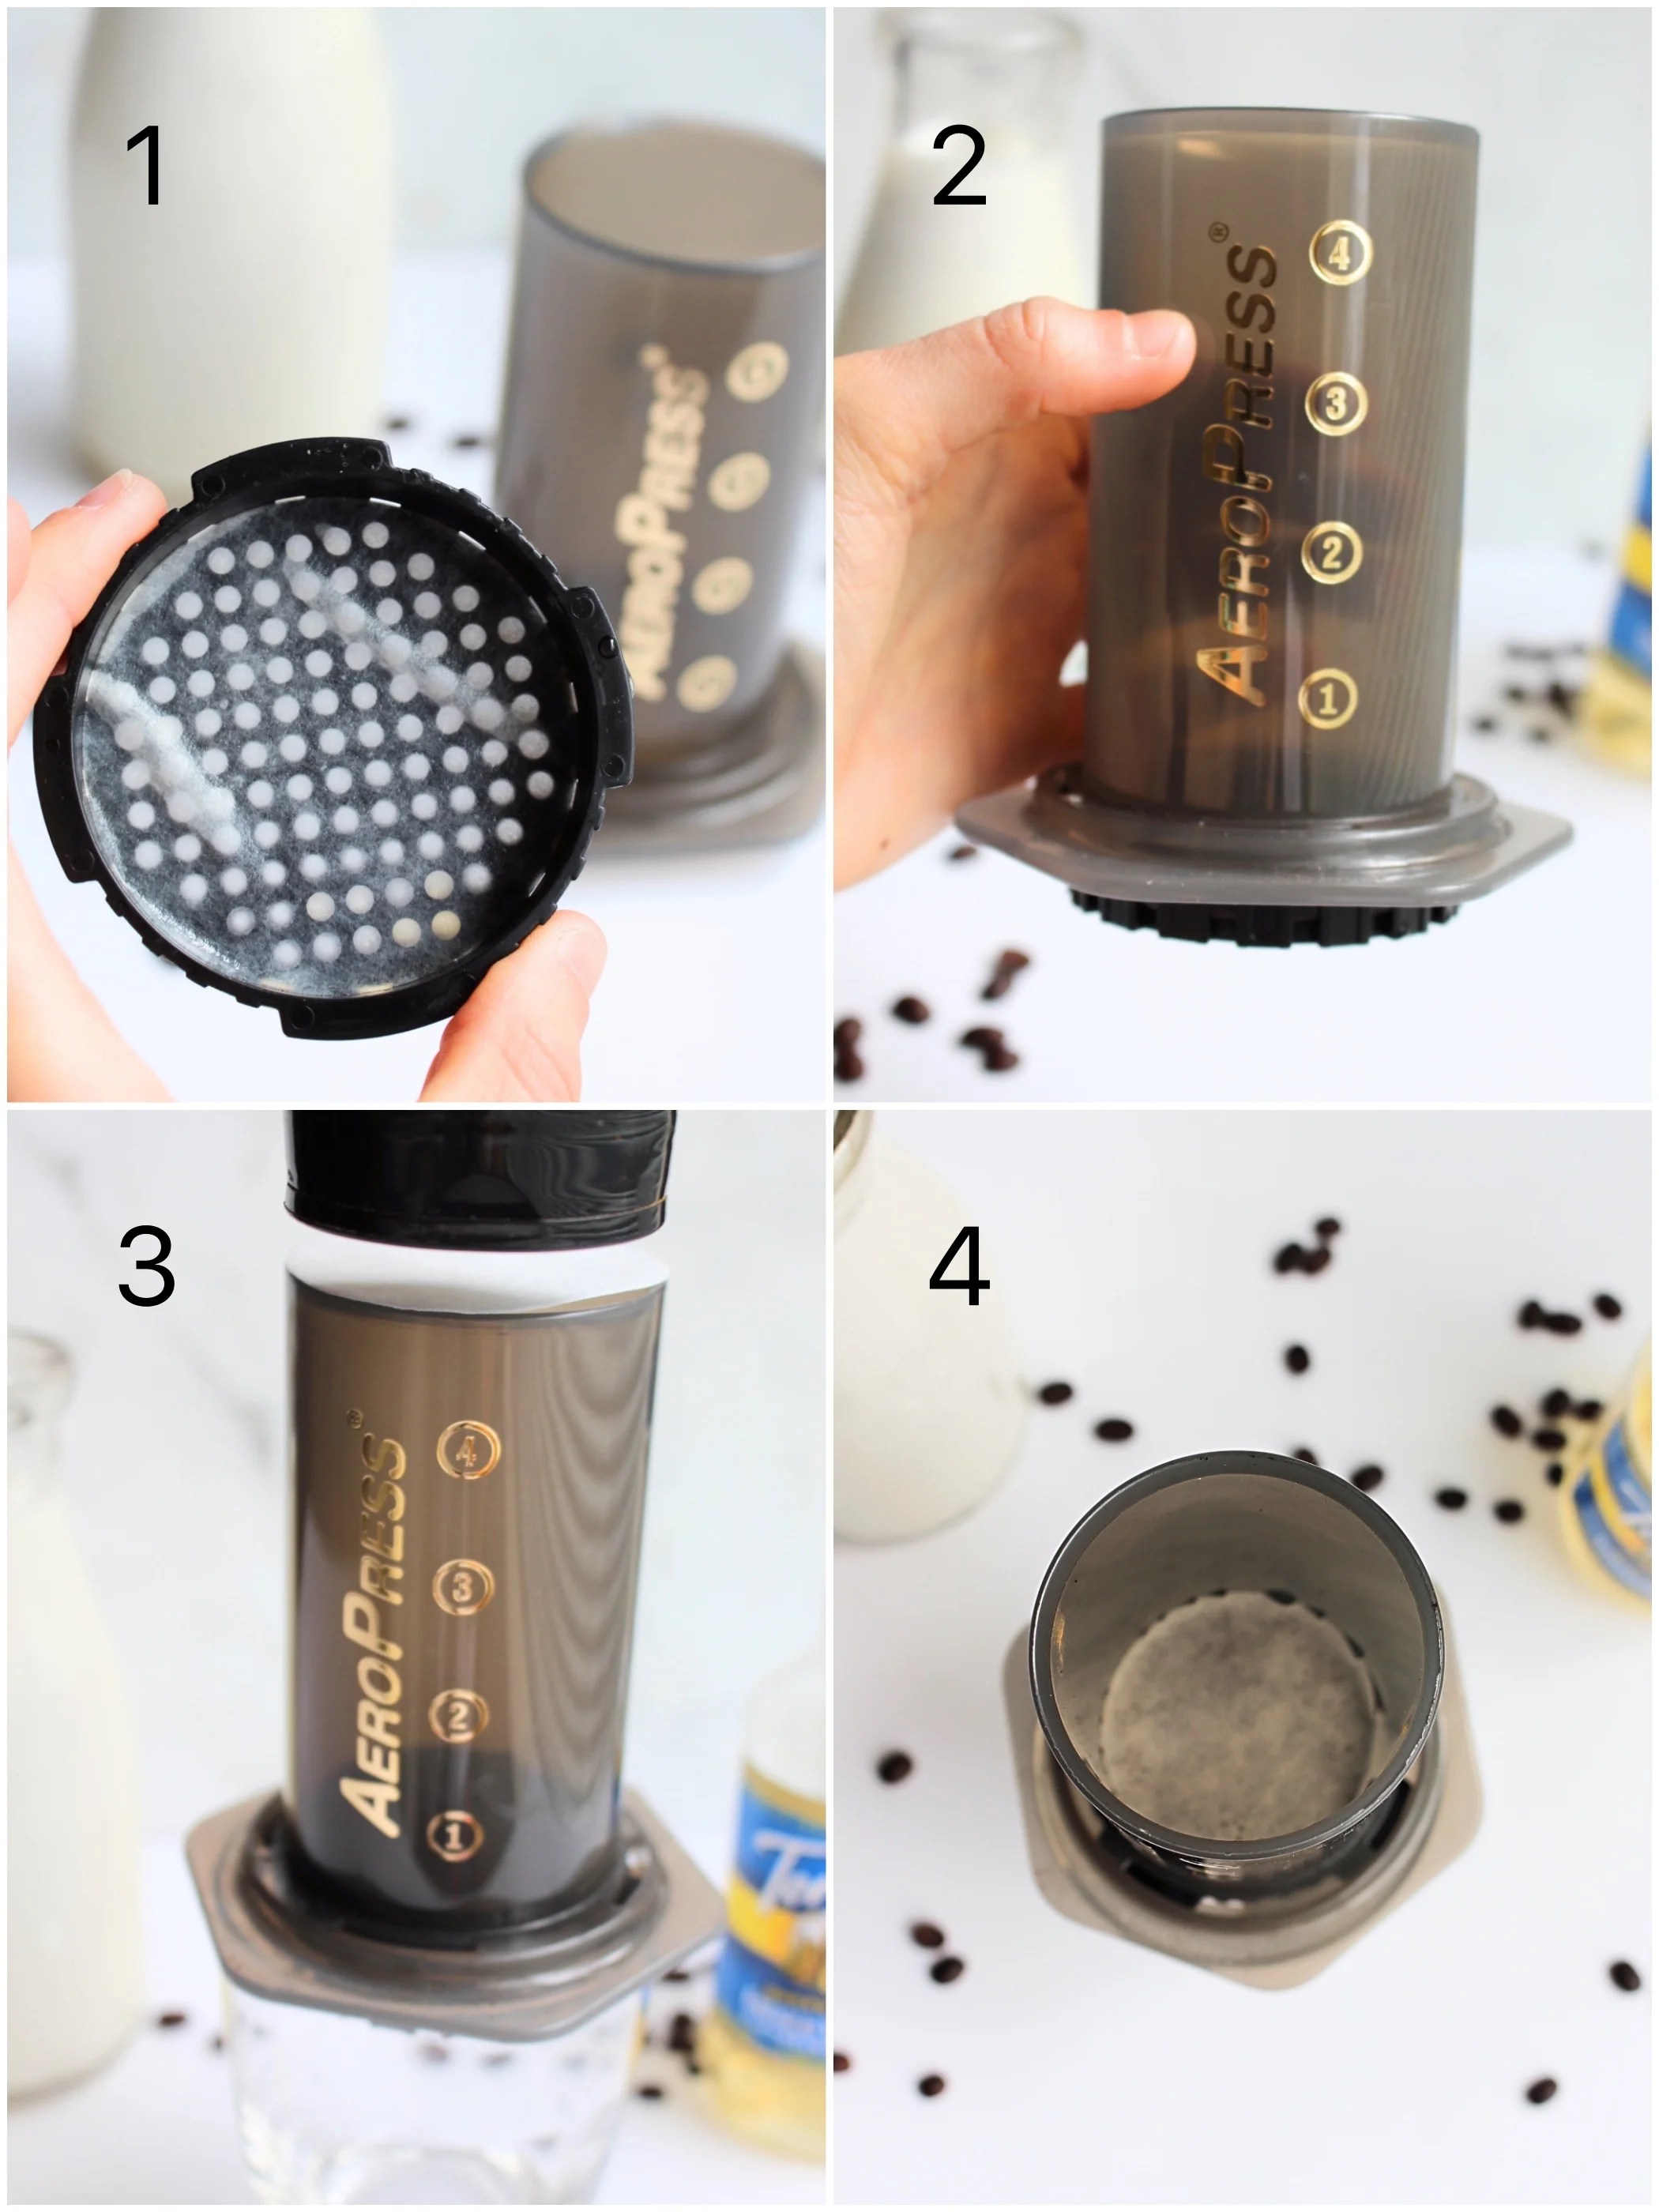
Next, set-up your aeropress. Place a paper filter in the black filter basket and wet with water. Screw it onto the bottom of your aeropress.
Grind your espresso beans finely with your coffee grinder. You'll need the equivalent of 4 cups, which is 1/4 cup finely ground espresso beans, or 16-17g. Place your grounds into the areopress.
The next step is to place another filter on top of the grounds and to press it down firmly. Be sure to shake the aeropress a little before you tamper it down so that the grounds are even. I use a spice bottle to press the filter and grounds down because it happens to be the perfect size in diameter and length. Now you're ready to make your espresso! (see picture above)
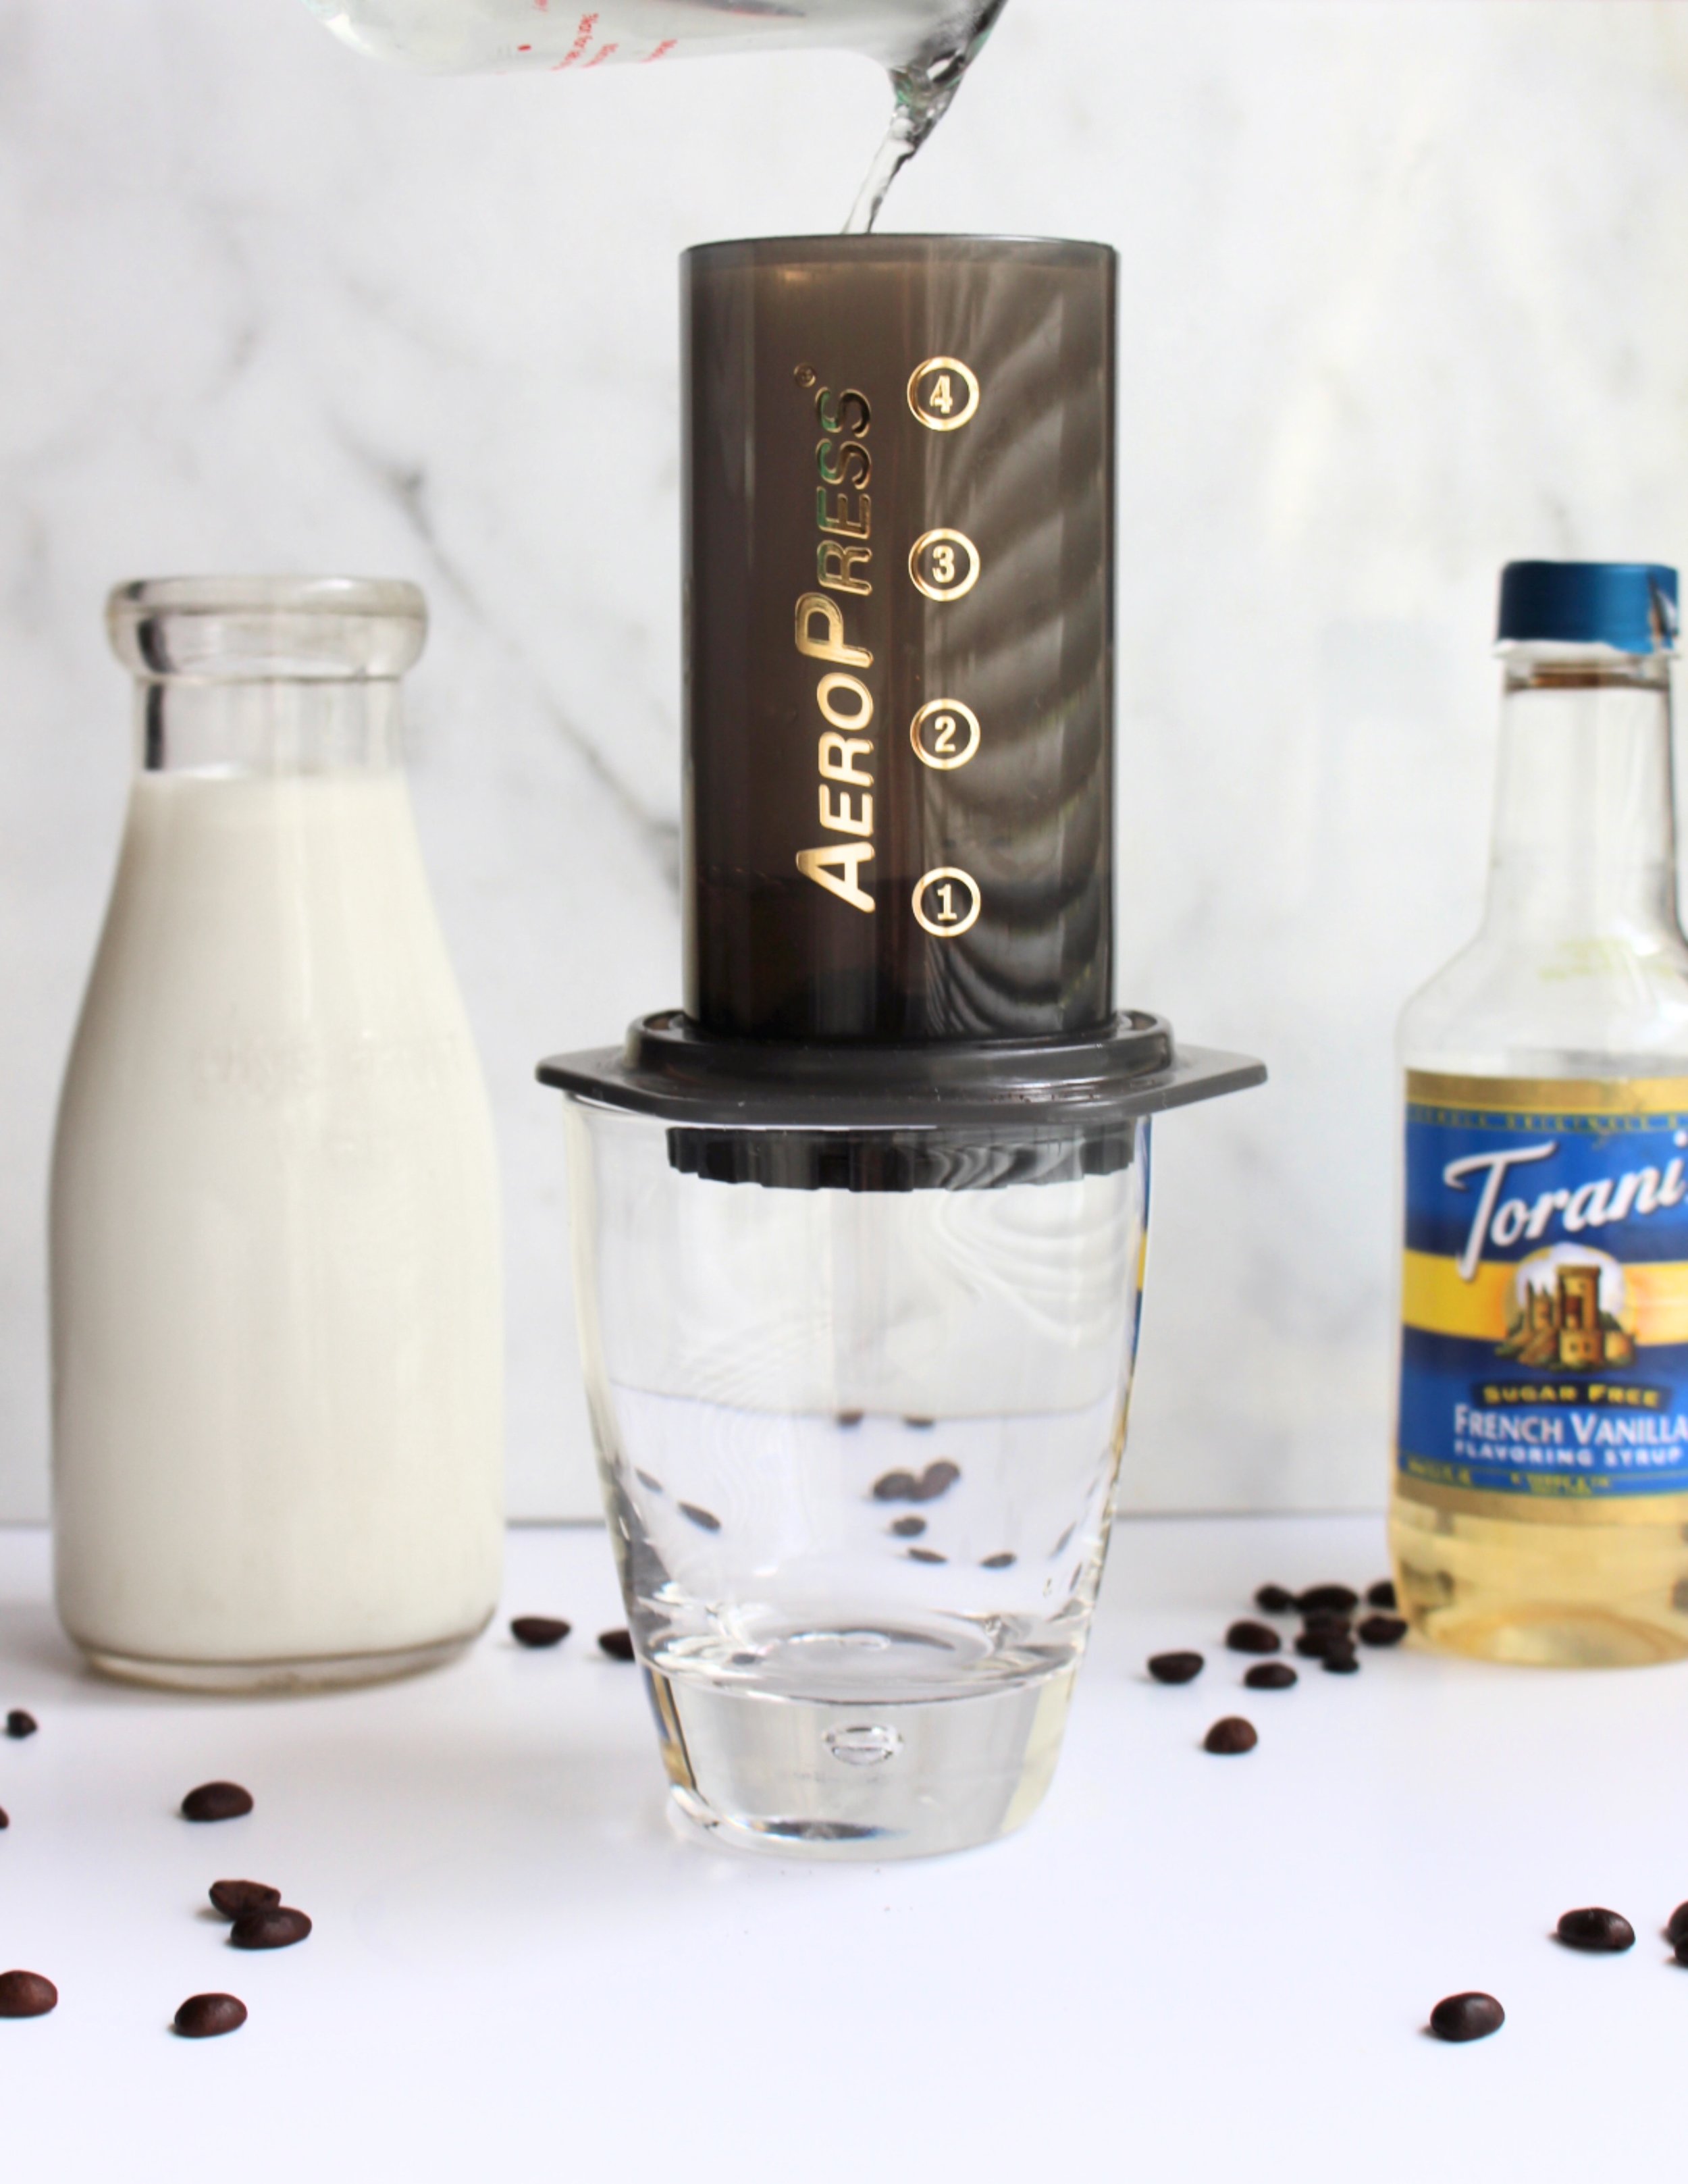
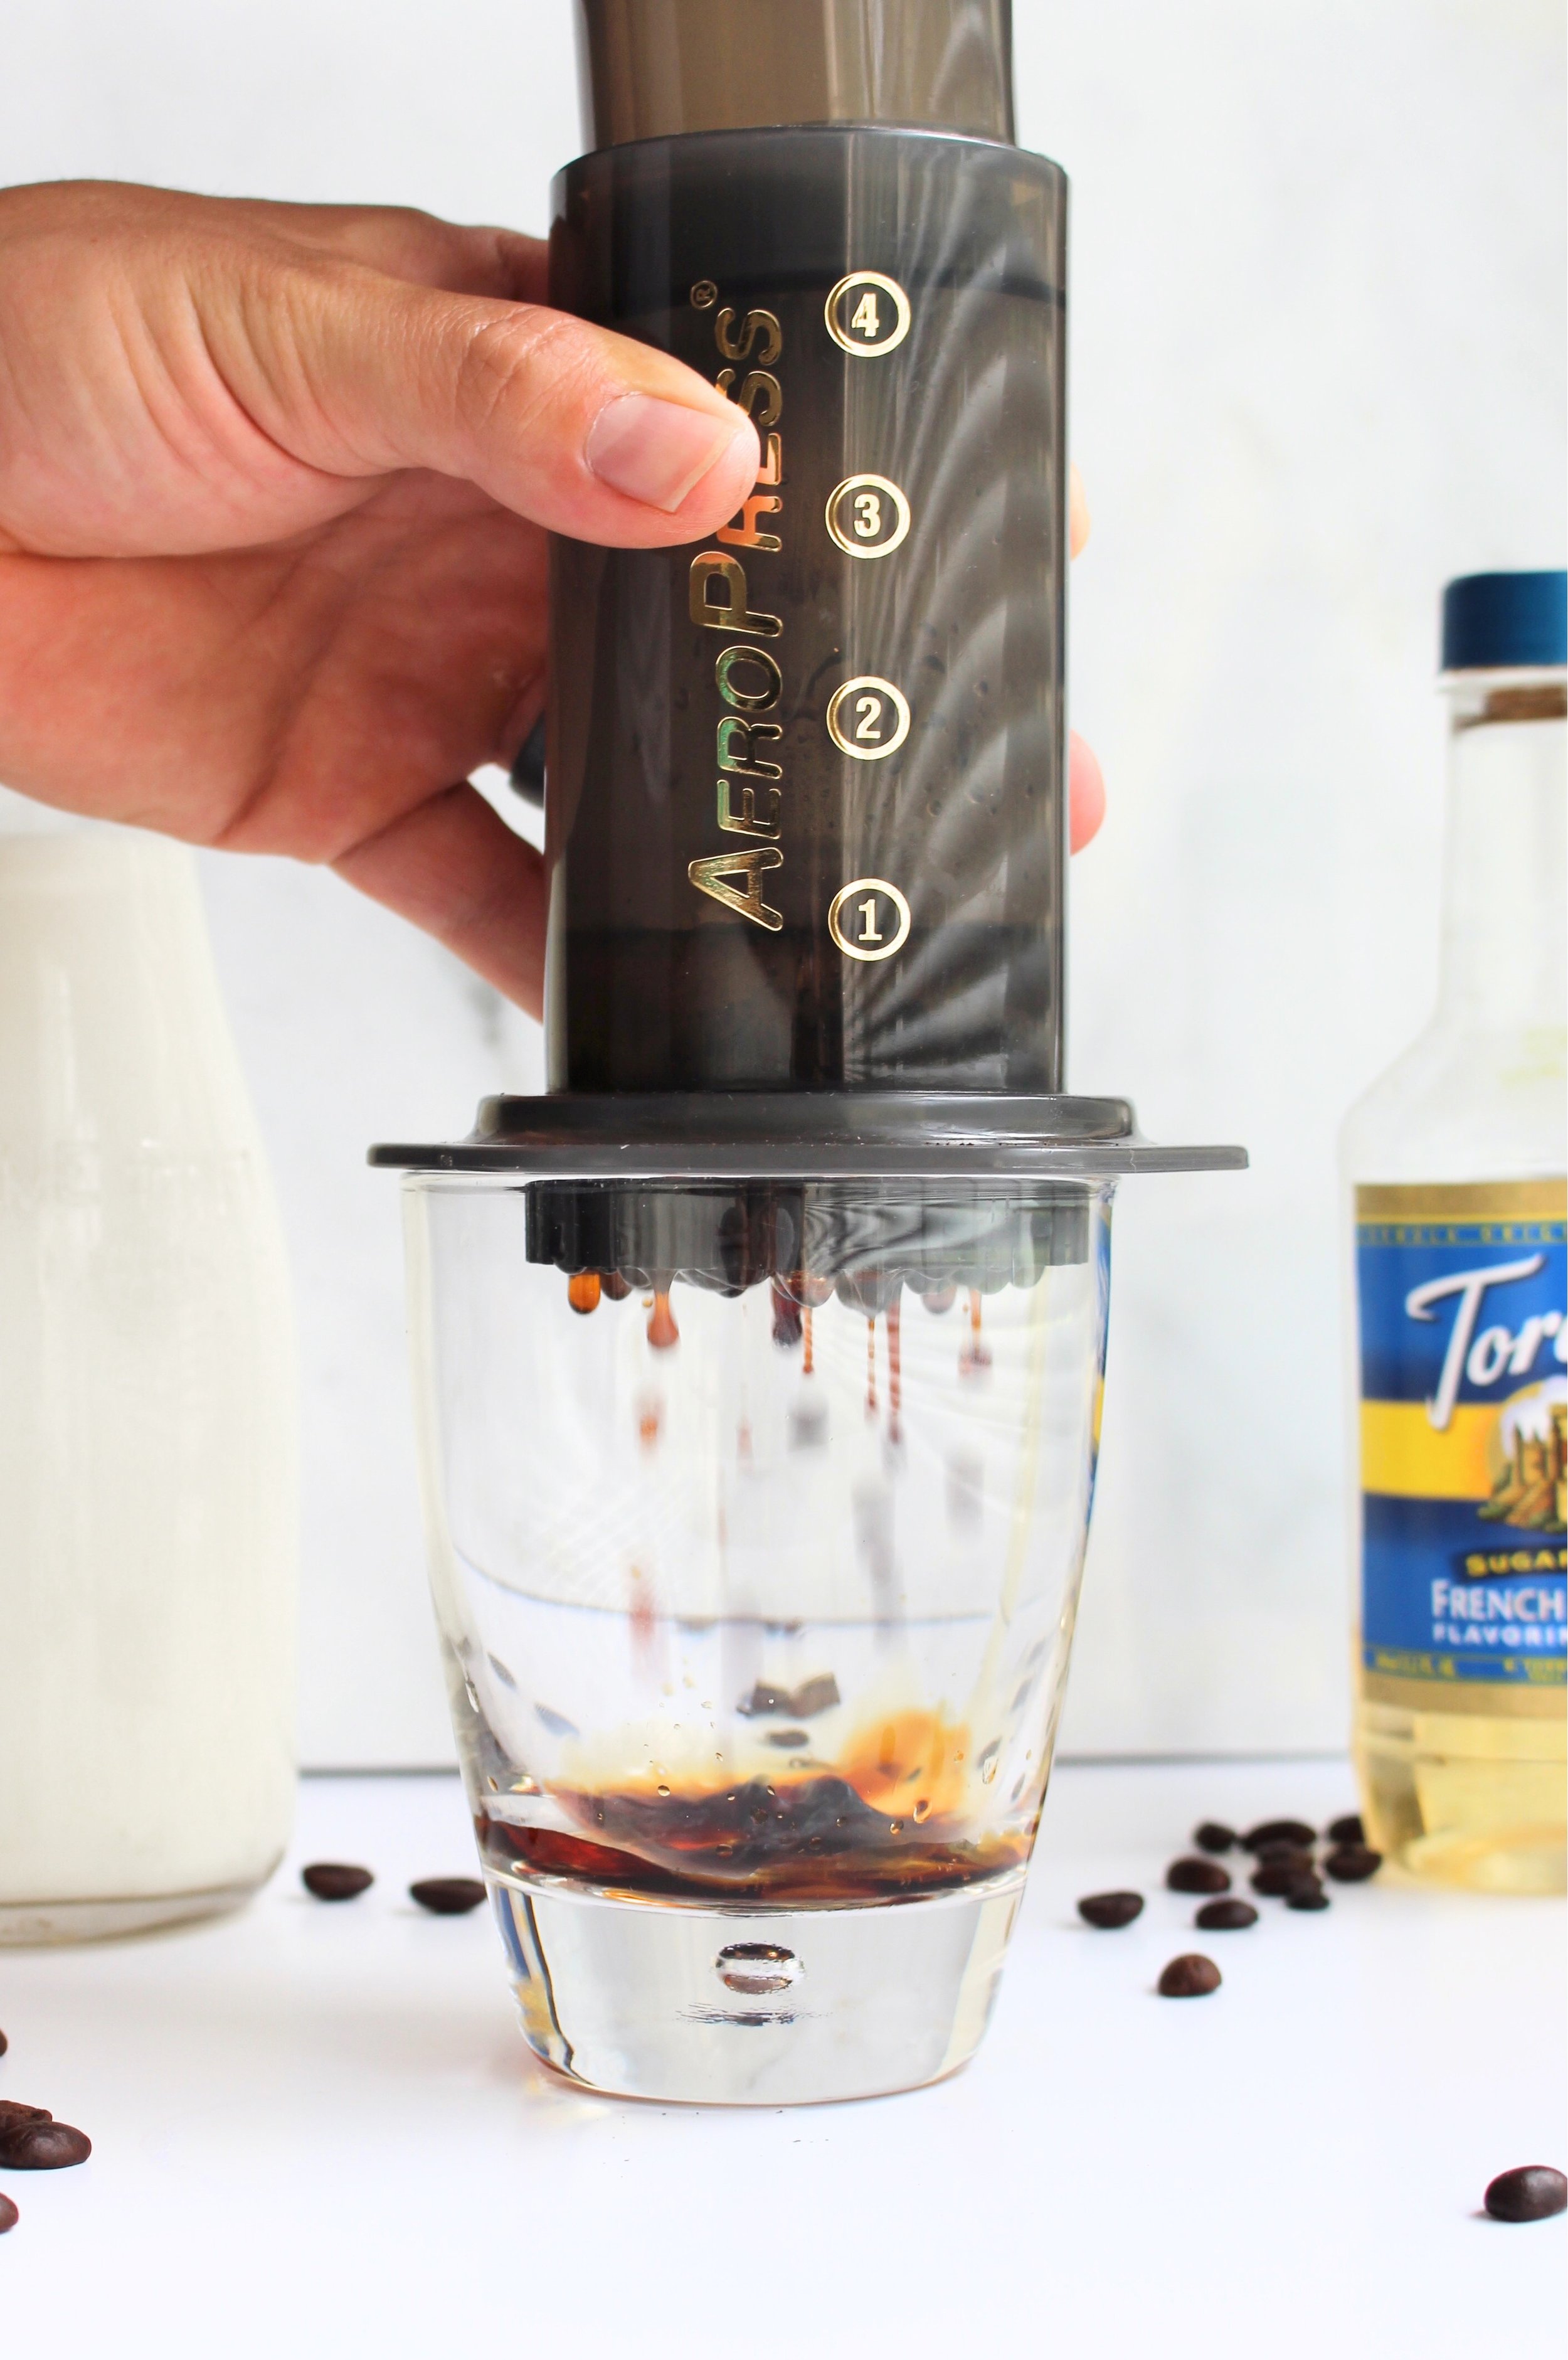
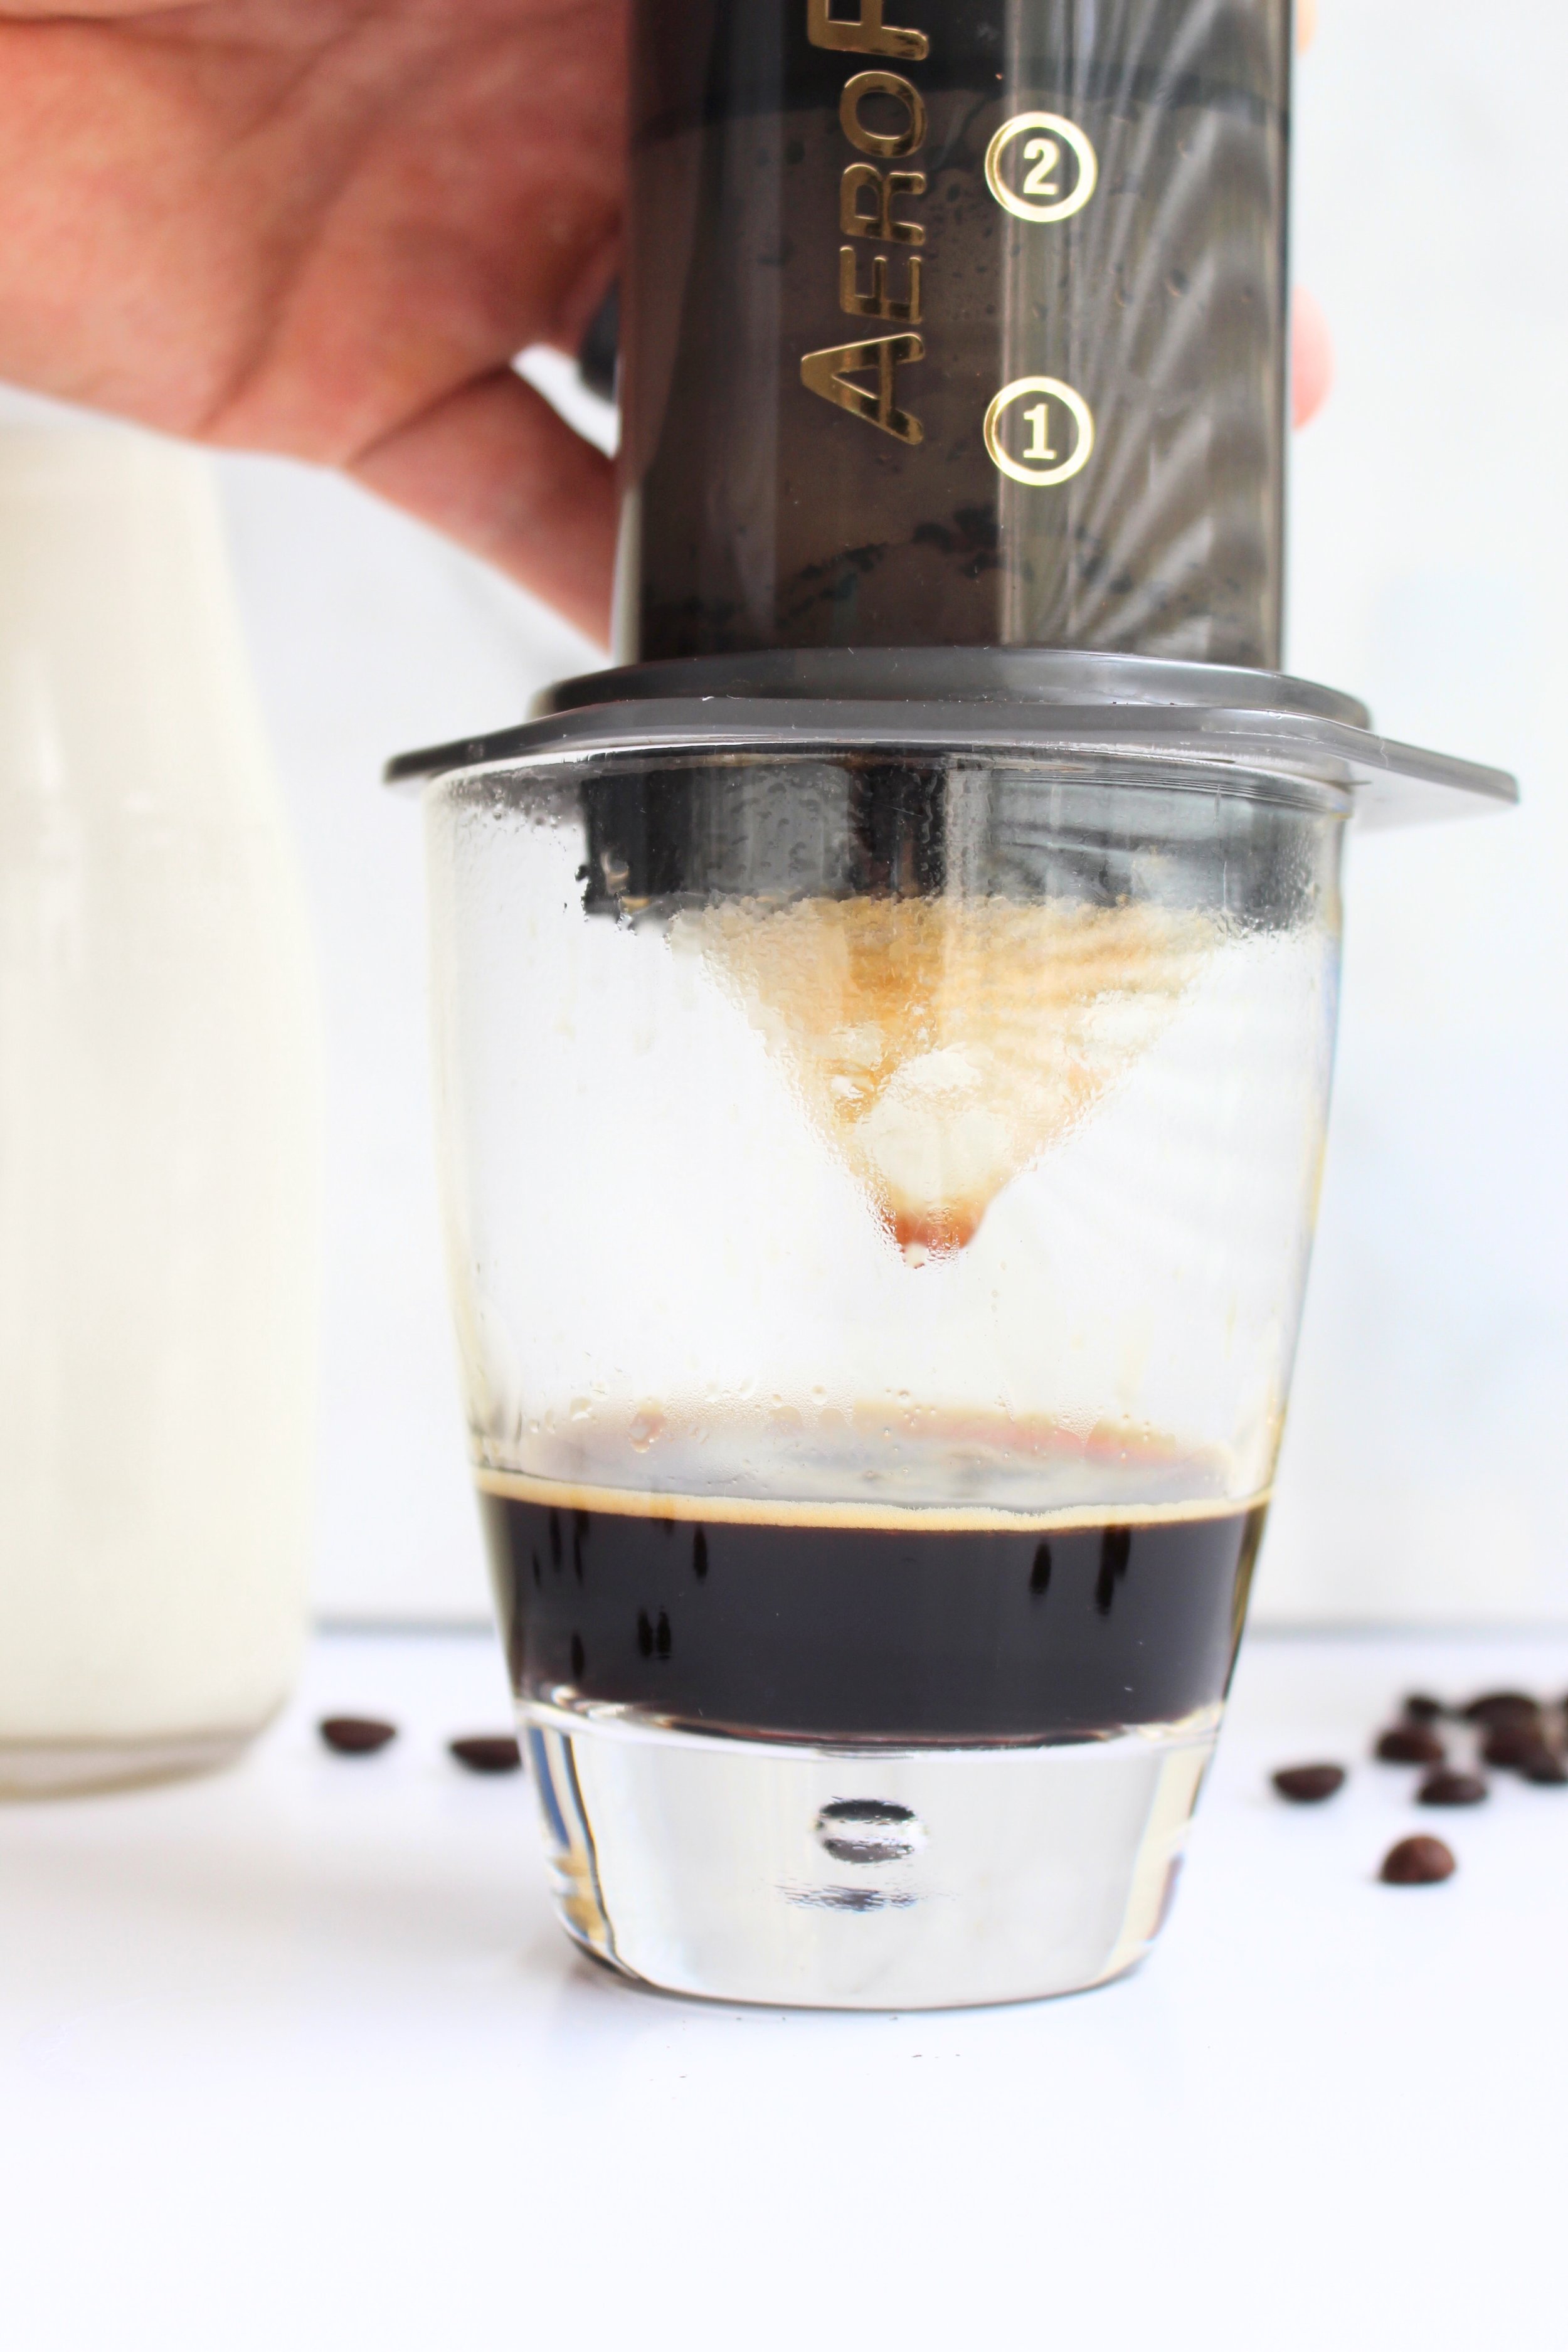
Boil 1/3 cup water and add to your aeropress. Place the plunger in and slowly press down until you reach the bottom. You will hear some hissing. I've read instructions that say to stop when you hear this, but I've had better luck pushing until I hit the bottom. I've been able to almost get a crema doing that.
Congratulations! You have just made a shot of espresso!!! Add to your cold milk, stir, and enjoy!!! Just an FYI, if you want a hot latte, just heat and froth your milk before adding the espresso instead of chilling it. It's delicious that way too. :-)

Gosh, I just think the coffee is just so beautiful! Don't you agree??...I know, I'm ridiculous. As far as the giveaway is concerned, the drawing begins today and ends Sept 26 and you can enter two different ways. The first way is to comment below with your favorite coffee drink (make sure to put your first name and last name initial). The second is to find my instagram giveaway post and comment by tagging a friend! I will be drawing and contacting one lucky winner Sept 27, so keep an eye out.
Can't wait to hear what you think about the final product. I hope you love it as much as I do! I'm sure your budget will :-)